Monday, September 23, 2013

Makin' That Paper

For most of our invitation and paper needs we used The Paper Boutique

Corynn is the owner and is so great to work with.  Not to mention she is quick, up on all her invitation etiquette, and quite a perfectionist. 

We met with her late last fall to go over our save the dates.  Here is how they ended up looking...


I knew from the get go that I wanted to do a post card Save the Date.  It's cheap, no envelope needed, and allowed us to incorporate a picture from our engagement session.  I also came up with the snazzy wording on the back thanks to a little site called Pinterest.  Each card only cost us $1 each and Corynn addressed them all for us. 
This past spring we sat down and began to discuss invitations.  Corynn had a million examples of different invitations she had made in the past with varying sizes, costs and colors.  We ended up picking the fairly simple design below.


Our colors were navy and ivory which, were represented in every part of the invitation.  To go with the vintage-y feel of the wedding we decided to add a lace ribbon down the side of each invite to personalize them a little more.  Corynn added each lace ribbon by hand (I would have went crazy!).  We had 3 inserts with info on the reception, directions to the ceremony and reception, and the RSVP post card.
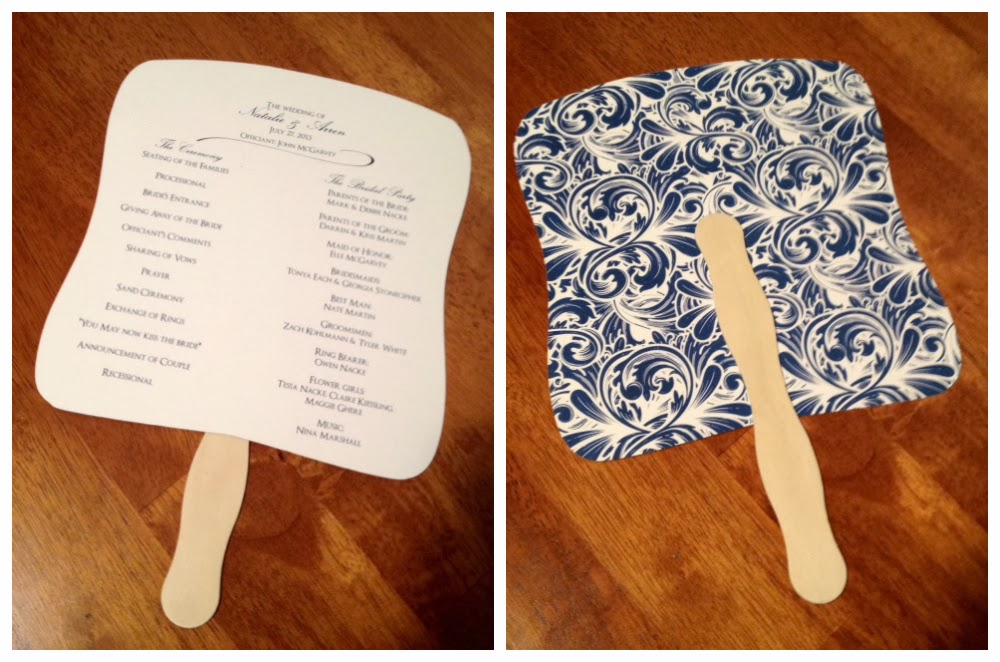
All together each invite cost us around $4.50 each.  Plus we had 65 cents of postage.  Corynn also did our table numbers, program fans, and escort board lists.  The table numbers were my favorite because they had a little bit of lace added to the tops to match our invites.
 
The program fans were made on very pretty scrap book paper so the backs were all kinds of colorful navy and ivory print.


One thing I did do myself was our bar sign that we put in an old vintage 8x10 picture frame.  We wanted something to sit on the reception bar to let people know what was free and what wasn't.  I used Pinterest and a friends own wedding bar sign for some inspiration and came up with this...


Not bad for a novice with a Mac!

That pretty much wraps up the paper details of the wedding.  I'll be back later to discuss all the reception decor... which might be my longest post ever!

Monday, September 16, 2013

Eating Machines

Here at Green Acres the youngest group of calves are still with their Mommas.  But because they have access to our barns at home we started giving them feed about a month ago in their own little pin.

They are eating machines!  I've never seen such little calves eat so much... They lick their plates feeder clean. It doesn't matter how much we give them it will be gone the next day.


Wednesday, September 11, 2013

Goodbye Granny Lamp

So the other night I got the wild hair to finally change our lovely green and gold living room lamps.  You can see in the picture below they were quite granny-rific!


My parents had gifted them to us 3 years ago and ever since then they have been a sore spot with our other living room furniture.

So for the past 3 years I've been mindlessly searching the web for 2 (cheap) lamps that I would love.  I had found a few at target that I'd been mulling over for the past few months but somehow I could never pull the trigger on buying two $40 lamps plus new shades.  All together that would have cost around $120... yikes!

That was when I stumbled upon this post from a fellow blogger... And the little tiny lamp's light bulb went off in my head.  Spray paint them!  It's a cheap solution and I can make them any color I want.

Then it was onto choosing a color.  Two of the three lamps I liked from Target were a dark gray/orb color (the other was wood and that obviously wasn't happening).  I headed to the local True Value to check out the spray paint selection and I was in luck, they had the perfect color!  I picked up a can of X-O Rust Professional Gray Primer, a can of dark gray Rust-Oleum gloss protective enamel spray paint, and some blue painters tape. 

I decided to take it one lamp at a time.  I wasn't sure if my slick metal lamps would hold the paint very well.  I taped off the little shade holder (I'm sure there is a professional term for this), the cord, and light bulb socket.  Then it was prime time!


The primer covered up the gold and green really well.  I let it dry and attacked the lamp with the darker paint.  I stepped back and oh my I admired my pretty new dark gray lamp for about 5 minutes.  I went ahead and did 2 coats of dark gray to make sure all the gold shinyness was covered.


Looking at my new babies I realized the only thing missing was new lamp shades.  I quickly zeroed in on a few choices at Target and decided on a light tan linen with a wavy design.  I thought the wavy design would play off the single dark gray color and the light tan matches our other living room furniture.


Here is the before and after.. 


I'd say that's a pretty awesome upgrade!  And it didn't cost an arm and a leg... All together the whole project cost about $70 for both lamps (including new shades) which saved me a whole 50 buckaroos! And the best part about this project is it is totally customizable.  You could have spray painted these lamps any crazy color your heart desired.

Monday, September 9, 2013

Turtle Man and Tree Slices

This is another one of those pesky wedding posts.

Our wedding had a very nature friendly and vintage theme going on.  In keeping with that theme I decided early on we were going to make our own tree slices from the huge stock pile of wood at Green Acres.  I had been searching online and tree slices were going for $20 a pop.  With our 21 tables at the reception that just wasn't going to fly.  And when I found a customized brander in the shape of a heart with our initials I just couldn't pass up the DIY project.

Somehow in my head I had it work out that this project would be a piece of cake.  That after a few fun hours we'd have 25 perfectly shaped tree slices.  Boy was I wrong!

We ended up with about 30 slices.  None were the same shape but that's what made them unique.  The biggest problem was crackage.  A week after we had successfully branded about 10 slices almost half of them had cracks.  After consulting a local wood expert he suggest we put them in a cool dark place.  That trick seemed to work and we managed to avoid any major cracks from there on out.

We knew then that we would need at least 10 extras for backups.  So my dad took up the chain saw and sliced log after log.  Each slice was about an inch thick and 12-14 inches in diameter.  


Our set up method was pretty simple.  We took a large tree stump and strapped it to a rack wagon.  Probably not the best or safest method, but it got the logs off the ground and made it much easier to make a straight cut.

Then we were on to branding which was a big hairy beast in it's own right.  The first day we branded about 8 and only 1 ended up working out.  We originally hoped to use an old mulberry tree but alas the wood was too hard to brand.  So then we started using pine slices and had a lot more success.


Here are a few tips for branding...
  • Make sure you have a good build up of really hot coals
  • Leave the brand in the coals for around 5 minutes so it gets nice and hot
  • Wet your wood... Pour water over the tree slice you are about to brand
  • Use some sort of protective glove (or several protective gloves... we ended up using an Ove' Glove and 2 potholders)
  • Get 2 boards to press down on each side of the brand (we didn't do this until the very end... this method worked the best for an even brand... when we applied pressure to just the handle  the brand started to warp and bend)
  • After each branding session you might have to reset and straighten your brand


So basically that is what I have to offer.  After completing the whole process I can totally understand why tree slices are so darned expensive to buy!  Would we do this again?... probably not.  We spent 4 Saturdays cutting wood and branding when we could have spent around $500 and just bought them online.  But, in the end each tree slice was unique and special to us and we managed to get 21 great looking slices for the reception.

Below is a video of the whole process.  It was taken pretty early on so we aren't using the 2 pieces of wood technique but you can get a good idea of what all went into the branding.  Plus my dad imitates Turtle Man and I couldn't pass that up!


Thursday, September 5, 2013

Pin-able

Here at Green Acres we are taking it up a technological notch.

If you would please place your cursor over the lovely picture below.


Yup, that's right folks you can now pin my posts and pictures to your Pinterest boards! 

I'm a huge fan of Pinterest.  I've used it for countless wedding ideas and lots of future home ideas.  After searching online for about an hour I finally found a way to make my pictures pin-able!  Just hover over them, click the giant red "P" and automatically be taken to your Pinterest page where you can save the picture along with the link to the blog post... You know so you can save your favorite posts and pics all in one place!

And for those of you wondering how I managed this magic, I refer you to this link.  It pretty much walks you through it step by step.  Do not be afraid of the html talk, I know nothing about this and was able to do it to it!  If this country bumpkin can figure it out you can too!

Wedding Photography

This post is about the wedding.

Saying it was an amazing day would be such an understatement.

First of all I'd like to give a huge shout out to Mother Nature.  It was 71 degrees, FOR A HIGH, at the end of July.  Pretty much unheard of.  People wanted coats and sweaters.  It was the perfect weather for the perfect day.

The ceremony was held at the University of Illinois Arboretum.  Such a gorgeous place filled with flowers and trees and all things nature (including a pond and Japanese garden).  We avoided the Japan House but managed to take pictures just about in every other location possible!

Which leads me to my wonderful and lovely photographer Kara Kamienski.  If you have a wedding coming up in the next year, 2 years, 5 years, I highly highly highly recommend you book her right now.  She's just so easy to work with and her bubbly personality makes you feel comfortable and at ease when her and her assistant are snapping hundreds of pictures of you and your spouse.


Next topic... still relating to pictures... Because we booked pictures through Kara we just happened to be lucky enough to get Blake Ransom to video our wedding and compose a short video for... drum roll... free!  Blake is new to the photography and videography wedding scene and was looking for experience this summer.  But let me tell you this... he is no amateur.  The short little clip he made of our day was absolutely perfect.  I cried... a lot... and have watched it almost a million times now.  Here it is incase you haven't seen it or want to relive the day.

And one last thing about pictures... As you can probably tell from the video above Arren and I did a first reveal.  I'm so so so glad we did this.  For one Arren was a nervous wreck while he was getting ready.  As soon as he saw me and got over the shock of seeing me all prettied up (it was pretty shocking!) he calmed right down and was ready for the wedding.  Also, it allowed us to take 95% of the pictures before the ceremony.  We had about 3 hours of pictures with us, our bridal party and our close family before the whole shindig even began.  Our guests weren't left waiting after the ceremony to get their party on and we were much less stressed since we had most of the afternoon to snap up pics.


In case you are wondering here is the general order we took pictures...
  • Everyone getting ready/rings/dresses/other little details
  • First Reveal
  • Bridal Party
  • Arren and I
  • Our close family
  • After the ceremony we took pictures with extended family
These few pics I have posted are ones Kara edited and posted to her Facebook right after the wedding.  I'm still anxiously waiting on the rest, but the wait will so be worth it to see all the amazing pictures and details Kara and her crew captured.

Wednesday, September 4, 2013

Time Apart

Um Hi...

All I've got to say is sorry for neglecting you blog.  But we seriously needed a break.  You were getting so demanding and needy, I just couldn't take it anymore.  Some time apart really made me appreciate you so much more anyway...

But now I'm back!  With more blogging ideas than eva.

It's been 2.5 months since my last post.  And somehow I've still gotten a trickle of page views a day.  What are you people reading?!  Perhaps you're reliving this year's baby calves, or are you coming back in hopes of a return post like this one.

Well today is the day... You trickle people must be jumping for joy!  Or at least sitting there twiddling their fingers trying to act as enthused as possible.

Biggest thing that happened was this little marriage ceremony and all of a sudden... Whoop, I'm a wife!

So for the next few weeks some of you will have to bare with me as I discuss and relive my wedding deets (deets is short for details... at least it is in my mind... don't question my abbreviation methods... I'm married now... I can abbreviate how I see fit).

I'll be sure to throw in a few farm posts between the wedding madness.  We've been bailing lots of hay.  The other day I went up in the loft to throw down some cow gold and about fell back down the ladder when I saw how much was stacked up there... it's a bit ridiculous. 

I've got some other big news but it'll have to wait.  I know the suspense is probably killing you all...

Stay tuned for wedding deets, farm posts and the big reveal... I promise it's pretty amazing!

And just because I can't end a post without one single picture... here are some babies!