
Our wedding had a very nature friendly and vintage theme going on. In keeping with that theme I decided early on we were going to make our own tree slices from the huge stock pile of wood at Green Acres. I had been searching online and tree slices were going for $20 a pop. With our 21 tables at the reception that just wasn't going to fly. And when I found a customized brander in the shape of a heart with our initials I just couldn't pass up the DIY project.
Somehow in my head I had it work out that this project would be a piece of cake. That after a few fun hours we'd have 25 perfectly shaped tree slices. Boy was I wrong!
We ended up with about 30 slices. None were the same shape but that's what made them unique. The biggest problem was crackage. A week after we had successfully branded about 10 slices almost half of them had cracks. After consulting a local wood expert he suggest we put them in a cool dark place. That trick seemed to work and we managed to avoid any major cracks from there on out.
We knew then that we would need at least 10 extras for backups. So my dad took up the chain saw and sliced log after log. Each slice was about an inch thick and 12-14 inches in diameter.

Our set up method was pretty simple. We took a large tree stump and strapped it to a rack wagon. Probably not the best or safest method, but it got the logs off the ground and made it much easier to make a straight cut.
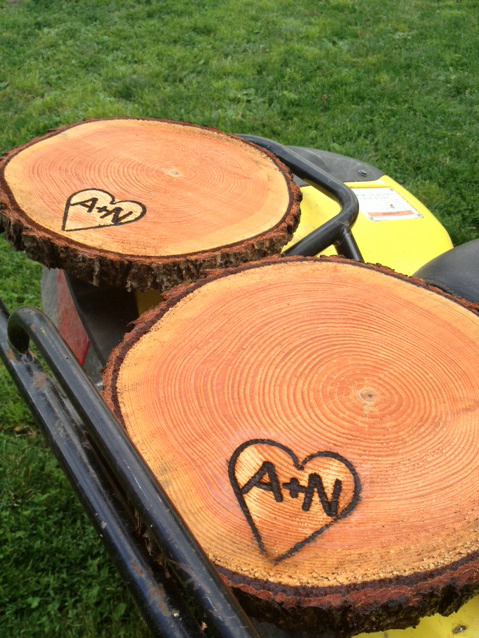
Then we were on to branding which was a big hairy beast in it's own right. The first day we branded about 8 and only 1 ended up working out. We originally hoped to use an old mulberry tree but alas the wood was too hard to brand. So then we started using pine slices and had a lot more success.
.JPG)
Here are a few tips for branding...
- Make sure you have a good build up of really hot coals
- Leave the brand in the coals for around 5 minutes so it gets nice and hot
- Wet your wood... Pour water over the tree slice you are about to brand
- Use some sort of protective glove (or several protective gloves... we ended up using an Ove' Glove and 2 potholders)
- Get 2 boards to press down on each side of the brand (we didn't do this until the very end... this method worked the best for an even brand... when we applied pressure to just the handle the brand started to warp and bend)
- After each branding session you might have to reset and straighten your brand

Below is a video of the whole process. It was taken pretty early on so we aren't using the 2 pieces of wood technique but you can get a good idea of what all went into the branding. Plus my dad imitates Turtle Man and I couldn't pass that up!
No comments :
Post a Comment